The last post was originally titled “Using E-Mail Templates”, then it was brought to my attention that what I really taught you was how to create E-Mail templates… hence the rename. So now I guess it’s time to show you how best to leverage these templates.
GoldMine E-Mail Templates are used in 3 ways:
- Subject-line drop-down messages
- E-Mail Merge to a list
- E-Mail Signature Files (look for a future post)
Subject-Line Drop-Down Messages
This feature is typically used to convey a standardized message, answers to frequently asked questions, etc.
- Start an e-mail like you would any other, possibly using the E-mail hyperlink on the record.
- At the end of the subject line, on the right side, you will see a triangle pointing down ▼. Click on the arrow and a drop-down list of all your public and personal folders will appear.
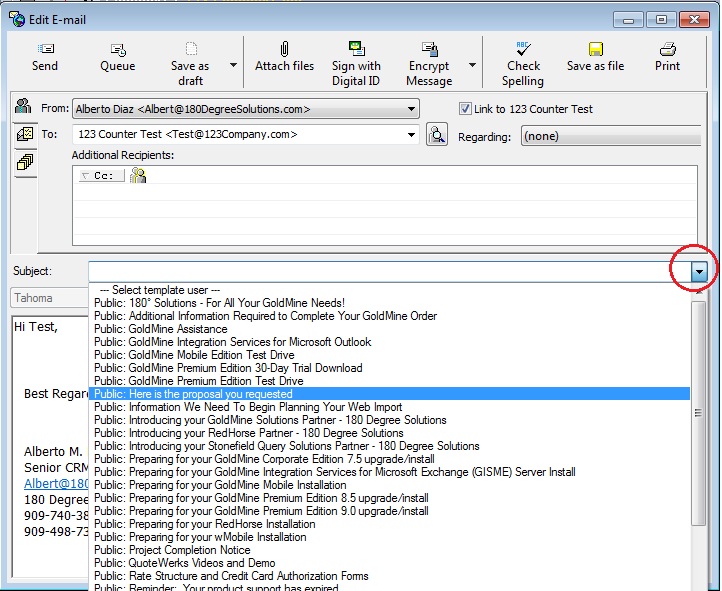
3. Clicking on the desired template, it will populate the e-mail subject-line and body with the template text.
You can now make some minor changes first or click the Send button and the e-mail will go out “as is”.
E-Mail Merge to a List
E-Mail Templates are also frequently used to do 1-to-1 marketing to a subset of contacts in your database. Whether that be a purchased list you just imported, predefined contacts, or an add-hock list, the steps are the same.
1. Define your recipient list. Be that using the Contact Search Center (for GoldMine Premium users) or a Filter, Group, or SQL Query (for Corporate and Standard users).
2. PE Users: Click on Actions | Begin E-Mail Merge…
CE/SE Users: Click on Contact | Create E-mail | E-mail Merge…
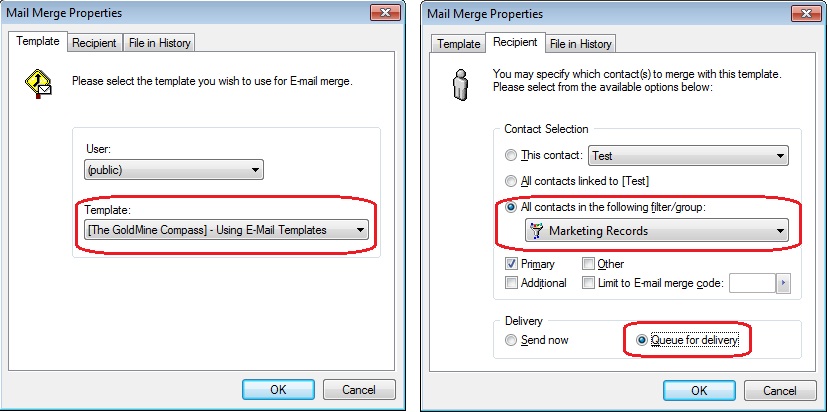
This will bring up the Mail Merge Properties Window with the Template tab open
3. From the Template tab, select the desired template.
4. Click on the Recipient tab.
5. Select your Group or Filter, if not already active.
6. Make sure you select Queue for delivery.
7. Click OK and GoldMine will generate individual E-Mails to all your selected recipients and place them in your Outbox.
8. Open your E-Mail Center.
9. Click your Outbox folder and scan through the list to be sure all looks good.
10. Right-click on the Outbox folder and select Send All (you can also send in smaller chunks by
highlighting some of your messages and sending just those).
Last Note: Why “Queue for delivery” instead of “Send now”?
- THE OOPS FACTOR: What if I selected the wrong filter? What if I selected the wrong template? What if I discover a mistake in my template? Queueing gives you 1 last chance to correct your mistakes. If you made a mistake, delete all the e-mails in your Outbox and try again.
- SENDING HICCUPS: Have you ever started sending a batch of e-mails and an error pops up? SMTP fails to respond, bad message, etc? Whether you have or not, queueing lets you recover from that without wondering who got the e-mails and who did not. The ones in your outbox have not gone out, the ones not in your outbox have gone out… it’s that simple.
- VOLUME CONTROL: Although we will discuss tools to help you manage your sending volume later, for those that can’t just send 10K+ e-mails all at once… queueing lets you create them ALL while allowing you to send them in smaller chunks.