Introduced in GoldMine Premium Edition 8.5, grid controls is one of those “how did we live without it all these years” type of feature. It makes finding specific items in GoldMine substantially easier and therefore allowing you to get what you need, FASTER!!
The best way to define what a grid is in relation to GoldMine is by example. When you go to the History Tab, the Activity List, the Contact Search Center, etc, the information is displayed as a list, in a row/column format (aka Grid). Every one of those grids has the same tools available to “control” the display. We will use the History tab of a contact record to explain the controls, but this functionality can be found throughout GoldMine.
1. Find a record with lots of History and click on the History Tab.
2. Right click within the list of history items to bring up the local menu.
At the bottom of the menu list you will see three grid controls, Group, Summary, Filter. In this post, we will cover only the Filter control, covering the others in future posts.
3. Select the Filter grid control, unless already checked. The column header will now have pull-down menus available, one for each column.![]()
4. Click on the User column pull-down and you will see a list of all values in this column in this grid for this set of data. In other words, this list is dynamically generated. The reason these user names are listed in this pull-down is because these users have completed history items for this particular contact.
5. Simply select the User you want to filter and GoldMine will only show you history for that user. You can even choose multiple columns to refine your list even more.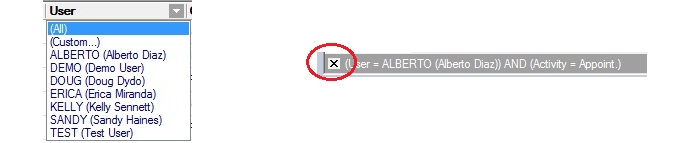
6. When you’re done, click the X at the bottom of the screen to turn off the filter, otherwise it will stay on even after you change records!
That’s all there is to it!
Enjoy and Happy GoldMining!!